Mostly I have been using inks, stamps, pastes & paints that have been part of my stash for years. It has been great re-discovering them all and finding new fresh ways to use them. Still it is also a lot of fun looking around for something new and or different.
When I came across something from Cosmic Shimmer part of their Andy Skinner range, and the video that demonstrated it I was hooked. I'm talking about Lave Paste and here is a link to the video. If you liked mixed media you will probably like this if you have not already discovered it.
Anyway as soon as my little pot arrived it had to be tested. I've used some Tando mixed media boards for these. All the boards were painted on one side with chalk paint as the base for everything to come.
1

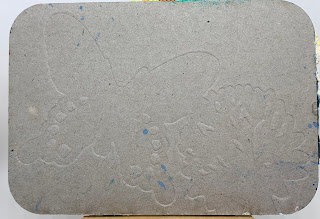
 Tando Board can be embossed with a folder. I was interested to see how the paste would react spread over some embossing. The blank on the left is the reverse showing the depressed side of the image. Paste spread, heat applied. Now the interesting effect of heating this stuff really gets interesting. Naturally the paste collected in the indents and being roughly level over the boards top. Under heat the Lava paste expands, the thicker areas growing more but retaining it's shape. As it expands it bubbles into little clusters of spheres.
You can see the effect of the expansion really well here the raised area of the board has been over taken by the paste and the embossing now looks like de-bossing. This and another board with wet paste we popped into the spray booth and blasted with some Imagination Crafts paint. Once again the colour was grabbed. As for the rest of this board various paints have been applied some acrylic with a brush, some white spray and then other marks added just for interest.
3


 These 2 have been stamped into. On the left a some what detailed stamp (the rose) used and then the outline flower stamp. Just as it grabs colour the paste also grabs the rubber stamp, there is real suction and resistance to releasing the stamp but the image is retained. This was the other sprayed and here the paste was still wet, no real difference between the wet or dry. Details have been picked out with acrylic paint it is interesting how each colour sits happily on top of the previous one. The final test on the left was to stamp on to the dry paste. The image did blur slightly on the paste but no so much that it distorts. This board was given a final blast with glimmer mist. The board on the right a much more detailed stamp was tried into the paste, embossing paste sprinkled onto the wet paste that was then heated. The gold ep does glimmer a little the green not so much. Another chalk pad touched over the surface the colour being picked up by all those gorgeous expanded peaks. Coral sprang to mind with this one hence the fishy additions.


Now I'm off to do something completely different. Stay safe, Keep well and HAVE FUN
When I came across something from Cosmic Shimmer part of their Andy Skinner range, and the video that demonstrated it I was hooked. I'm talking about Lave Paste and here is a link to the video. If you liked mixed media you will probably like this if you have not already discovered it.
Anyway as soon as my little pot arrived it had to be tested. I've used some Tando mixed media boards for these. All the boards were painted on one side with chalk paint as the base for everything to come.
1

This was to see how the paste and vellum react to each other and to see if this paste can be an adhesive. Vellum does not like to be wet and tries to retreat from many water based products. Here the Lave paste was spread over the vellum and board, both were perfectly happy. The suggestion is that you heat the paste once applied rather than wait for it to dry so I blasted it with the heat gun but maybe not enough.
Later I did blast it again, but more about the effects of heating it later. To complete this board I stamped and fussy cut the XPS Canna Lily then coloured just the stamens yellow. Then using a felt pen added some colour to the dried paste. Gosh this stuff really grabs the colour look at the yellow! Using a chalk ink pad the edges of the vellum coated with more of the paste were lightly touched. The little bee is a finishing touch, really pleased with how this worked.
2

 Tando Board can be embossed with a folder. I was interested to see how the paste would react spread over some embossing. The blank on the left is the reverse showing the depressed side of the image. Paste spread, heat applied. Now the interesting effect of heating this stuff really gets interesting. Naturally the paste collected in the indents and being roughly level over the boards top. Under heat the Lava paste expands, the thicker areas growing more but retaining it's shape. As it expands it bubbles into little clusters of spheres.
You can see the effect of the expansion really well here the raised area of the board has been over taken by the paste and the embossing now looks like de-bossing. This and another board with wet paste we popped into the spray booth and blasted with some Imagination Crafts paint. Once again the colour was grabbed. As for the rest of this board various paints have been applied some acrylic with a brush, some white spray and then other marks added just for interest.
3

Here the paste was simply pushed through a stencil which it does beautifully. Blasted with the heat gun again. Here you can see how if not heated or heated enough the paste stays a dull colour and is very flat. Where the paste really took the heat it turns white and expands. Here rainbow colours were baryered over the top. The expanded peaks grabbed the colour and protected the flatter area below while on the flatter smoother area the colour is more evenly spread. The stencil was then re-applied and Lightening Black tapped over it on the areas with little of no paste. Again the Lava paste took the colour cleanly.
4 & 5


Overall I am now officially in love with the Lava paste. It is quite runny when it comes out of the pot and I do need to practice spreading it. I've not mentioned that once dry it is still soft to the touch having a slightly rubbery feel. This is quite unlike any paste I've worked with before.
I'm using the first board, with the Canna Lily, to enter:
Inkspirational - Painting or Colouring (fortnightly)
Just Add Ink - Choose 2 of 3 options I have Flowers and Texture (weekly)
A Gem of a Challenge - Anything Goes (weekly)


Now I'm off to do something completely different. Stay safe, Keep well and HAVE FUN
What cool technique! On the first card I like the texture that you added and the vivid colors of the flowers. Thanks for playing at Inkspirational!
ReplyDelete- Shauna
WOW! So many fabulous textural elements! Lovely card! Thanks for sharing at Just Add Ink.
ReplyDeletePerfect card for our challenge this week, wowsers! Thanks for sharing it with us at Just Add Ink.
ReplyDeleteI always enjoy reading about techniques and new products Zoe. The lava paste sure does sound like a fun product and it can be used in tons of different ways. Thank you for this post...I learnt lots x.
ReplyDelete